Converting a HioPOS Plus Point of Sale to Ubuntu with Working Elo Touchscreen
Here are lessons learned for anybody who wants to play around with converting a HioPOS Plus to a kiosk or Point of Sale.
So far, I've been able to successfully:
- install Ubuntu 14.04 LTS on the native hard drive
- get the ELO touchscreen working without proprietary drivers
- write to the customer-facing LED dot matrix display on the rear
- confirm that the Wi-Fi and credit card swipe / swiper work without any changes
- access the RAM slot behind the screen to add more RAM
- make the thermal printer print gibberish (appropriate driver unknown)
Installing Ubuntu from a USB Stick
- With the power off, insert the bootable 32-bit USB stick into an empty USB slot.
- Start the HioPOS Plus and press DEL repeatedly on the keyboard as it boots.
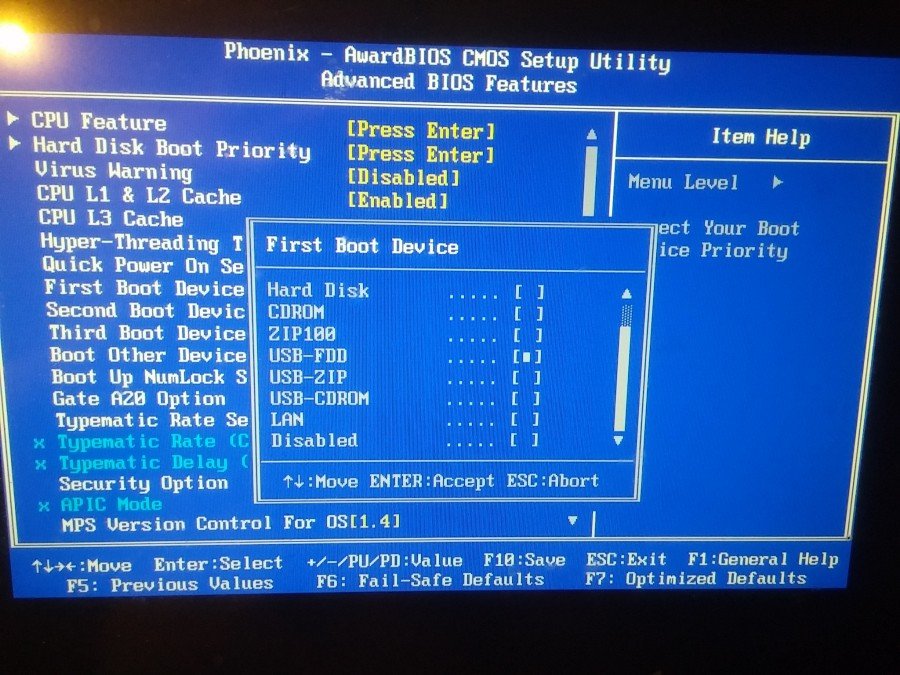
- The blue BIOS screen comes up. Select Advanced BIOS Features.
- Change First Boot Device to USB - FDD. Then, under Hard Disk Boot Priority, move the USB live disk device into the first position.
- Save and exit the BIOS and it will reboot
- Upon reboot, if it goes into Windows (or whatever is on the main hard drive) then double check the BIOS settings above and make sure the USB is actually bootable (try it in another computer)
- If you see a black screen and "Not a COM32R image" then the solution is to hit TAB on the keyboard and then type live and hit ENTER (or live-install would probably work too).
- "live" should boot to the USB stick and start Ubuntu on this hardware. Once on the Ubuntu desktop here is an icon to install Ubuntu.
- Go through the Ubuntu install process, connecting to the Wi-Fi / network during installation is preferable.
Getting the Elo Serial Touchscreen to Work
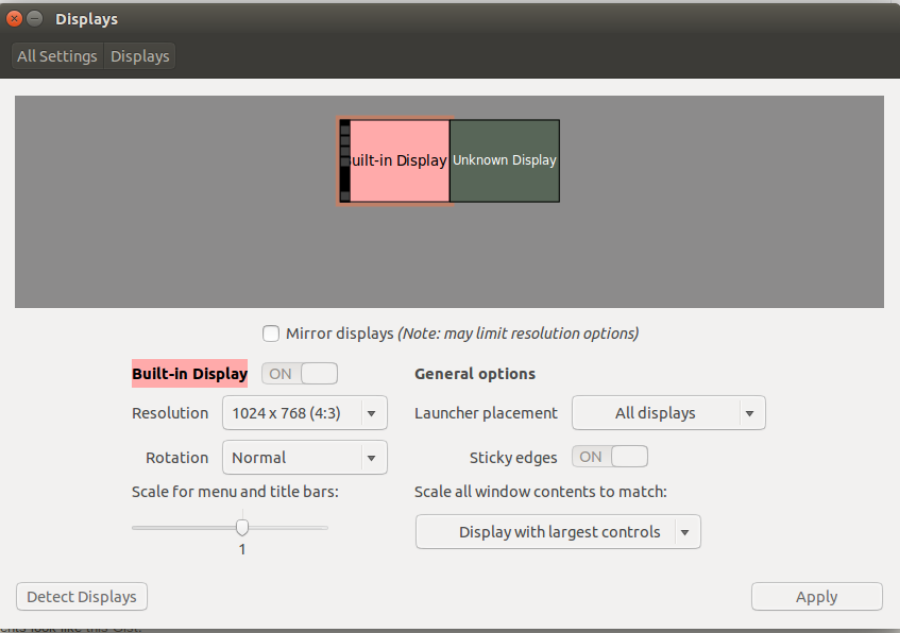
This isn't noticeable at first, but when Ubuntu starts it registers two displays. Under the Ubuntu menu (Windows Key on the keyboard) type Displays and open the Displays program.
If you see two displays, then the one to the right labeled "Unknown Display" should be disabled. Click on that display and then toggle the screen to Off (top-left toggle). The screenshot below shows the "Built-in Display" still on, which is the only display that should remain on.
I don't see any markings on the hardware and Linux doesn't disclose much about the ELO touchscreen. However, I was able to look in the "Drivers" directory of the default HioPOS Windows XP installation and found an Elo directory and the Elo settings tool in Windows disclosed the model as a AccuTouch 2210 with Serial Controller
This isn't necessary, but if you type xinput --list then it will give info on attached input devices. The Elo shows up in the list, but you probably want be able to recognize it until after the drivers are installed below.
Note, I actually tried the proprietary Elo Linux serial 32-bit drivers for the Linux 3.x kernel and I don't remember what worked and it caused pop-up errors on boot. There's a much easier solution below. Though, IF you go that route I believe you can satisfy the Motif requirement with "sudo apt-get install libmotif-dev, but I'd recommend not using the proprietary driver.
The steps I took basically were all part of the Ubuntu Touchscreen Wiki, with one deviation on the calibration side.
- Run sudo apt-get install screen just to make sure you have the screen program
- Determine which serial device the touchscreen is using by going to the terminal and trying sudo screen /dev/ttyS0 and then touching (press hard with your finger) on random parts of the screen. If it you don't see a bunch of gibberish in the terminal window then press CTRL + C to get back to the terminal prompt. Try the next number (1), like sudo screen /dev/ttyS1 and click random spots. In may case, ttyS1 was the correct device and I saw random stuff as I touched the screen. Press Ctrl + C to return to the prompt. If you didn't see anything then continue with testing ttyS2, ttyS3, etc until you find it.
- I stopped at ttyS1 knowing /dev/ttyS1 was the correct device for me. Interestingly, ttyS1 is the second serial port (in Windows this is COM 2)
- Run /usr/bin/inputattach --elotouch /dev/ttyS1 and the touch screen should start working. Though, as you click around you'll probably notice it clicking on the opposite side of the screen, which is fine for now
- In order to make the touchscreen register on startup we need to edit a startup file, like /etc/rc.local. So, do sudo nano /etc/rc.local and add /usr/bin/inputattach --daemon --always --elotouch /dev/ttyS1 before the exit 0. If your device is not at ttyS1, then use your correct number. Save it (for nano, that's Ctrl + X and Enter) and reboot the computer, sudo shutdown -r now
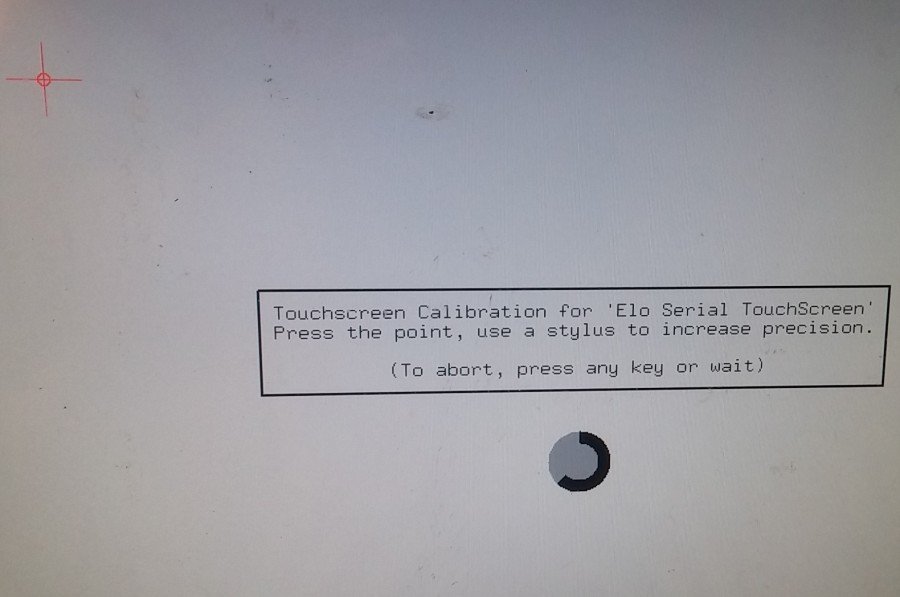
- When it restarts the touch screen should work, but likely registers your touch on the wrong side of the screen. We need to calibrate and account for the inversion.
- On the terminal, run sudo apt-get install xinput-calibrator to install the calibration tool. If you have trouble installing it then see the Wiki's Calibration section
- Then start the calibration by running sudo xinput_calibrator --output-type xinput
- A screen should pop-up and you have to click targets in the 4 corners. When it's done your screen should work normally and it will print important calibration commands in the terminal window. There will be one or more lines that start with xinput set-int-prop. Copy those lines.
- Now, we need to put these calibration commands in a start-up script for your graphical environment. NOTE: I tried to put the calibration code in /etc/rc.local and it DID NOT WORK, so don't bother with that. The /etc/rc.local should only have the inputattach code in it.
- I'm using the default Unity environment, so added a Unity start up script at ~/.config/upstart/elo-touch.conf
- The script's contents look like this Gist.
- Reboot again. Assuming the /etc/rc.local attaches the touch screen and the ~/.config/upstart/elo-touch.conf runs the calibration, you should have a working touchscreen that stays after reboots
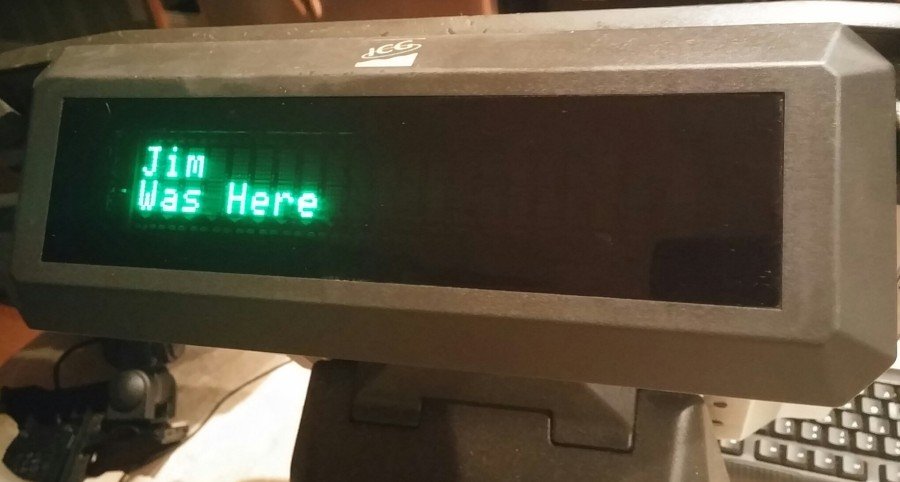
Writing to the LED dot matrix display
This LED is on the rear of the POS and may have been an optional accessory. For me this is connected to serial port 0, which translates to /dev/ttyS0 in Linux/Ubuntu.
You can write to it by doing things like:
- write words to it, like echo 'Jim was here' > /dev/ttyS0
- open a console to it and type whatever you want in real time, like screen /dev/ttyS0 9600 and then just type and it will appear on the LED
Upgrading the RAM
The older model that came with Windows XP has two DDR2 PC2-4200 533 Mhz SODIMM non-ECC slots behind the touchscreen. They can hold up to 1 GB each, for a total of 2GB. The newer HioPOS appear to go up to 4GB, but I'm pretty sure this older model only goes to 2GB.
To upgrade the RAM, put the screen flat on a surface and remove all the screws around the outside edge/bezel. There are normally small, sticky black dots covering the screws in question. If there are devices in the way then the'll need to be removed. Once all the screws are removed simply lift the base from the screen. There are 3 wires that are connected between the screen and the motherboard, but there is sufficient slack to put the base to the side without disconnecting the wires. One of the SODIMM slots is in plain-sight on the top of the motherboard. The other is below the motherboard, which requires removing the hard drive and the input devices on the side opposite the hard drive, plus removing a bunch of screws.
Trying to Get the Senor TP-250 II Thermal Printer Driver Working
The printer I have is a Senor TP-250 II. Their website only has Windows drivers. I tried a handful of Generic Ubuntu drivers and can get it to print gibberish (random characters), but didn't find a driver that worked. I put in very little effort on the printer, but if you figure out how to make it work then please let me know via our contact page.
Side note: the HioPOS hardware appears to be primary manufactured by Senor Tech Co., as that's what is printed on some of the boards inside.
Cashdrawer
I didn't try a cashdrawer yet, but usually there is a wire that goes from the cashdrawer to a port on the receipt printer and when the printer triggers the drawer to pop when it prints. The driver can control when it pops, so getting a cash drawer to work is likely dependent on getting the thermal printer driver to work.
Credit Card Swiper and Wi-Fi
These worked by default with Ubuntu 14.04 LTS. To test the credit card swiper, open Text Editor and swipe the card. If you see a long string of text that has the cardholder's name and credit card number, then it's working.
Lovingly crafted by orangecoat with some rights reserved, and a promise not to spam you.
Back to top